Having procrastinated for around a month, I finally got around to acquiring the chemicals for a standard cyanotype (I went with digitaltruth.com) and followed the method given in “The Book of Alternative Photographic Processes” by Christopher James, which my friend Lea loaned me. I started out with a 1/5 batch of each solution (thus 20 g ferric ammonium citrate & 100 mL water, and 8 g potassium ferricyanide & 100 mL water).
The book had wonderful, detailed instructions, most of which I ignored for now because I was just trying to get the feel of the cyanotype process…
-
Sunshine was in short supply and it was snowing anyway, so I used someone’s UV lamp instead. It doesn’t provide very even lighting, but it looks plenty bright.
-
The book said to let the individual chemical mixtures “ripen” for 24 hours before mixing them. I was too impatient to do this.
-
I attempted all my prints on some crappy 8.5x11 paper that is flimsy and likely has some detrimental chemicals in it.
-
I probably should have invested in some clothespins to hang things up to help them dry.
-
I still don’t have any dark glass containers to store the mixtures in, so I just coated a jar in a layer of tape.
-
I don’t know where to find a hake brush, so I used some (metal-free) foam brushes from the hardware store.
Dave from Hive13 already had a transparency on hand that he had used to burn an image for screenprinting, and I used that as my negative. It had only black-and-white, but I’ll try with a negative with actual gray tones later.
The first attempt sort of worked and had a clear image exposed after about 20 minutes. I thought was a good first step since it indicated that I’d mixed the chemicals properly and that the UV light was sufficient. However, when I washed the paper in cold water, nothing at all remained. This looked to me like major underexposure, or a case of the paper just being unsuited to cyanotypes.
I tried again with a different image and exposed it a little longer, but results weren’t much better. Some of the darkest areas developed to a very light, almost invisible blue. I looked to the textbook for advice on how long to expose, and it said to go until the darkest parts had exposed past blue to almost a silvery-gray sort of shade.
So I tried to follow that advice on the third attempt I made… actually, I wanted to expose it longer than I did, but I needed to get back home so I rushed it a little.
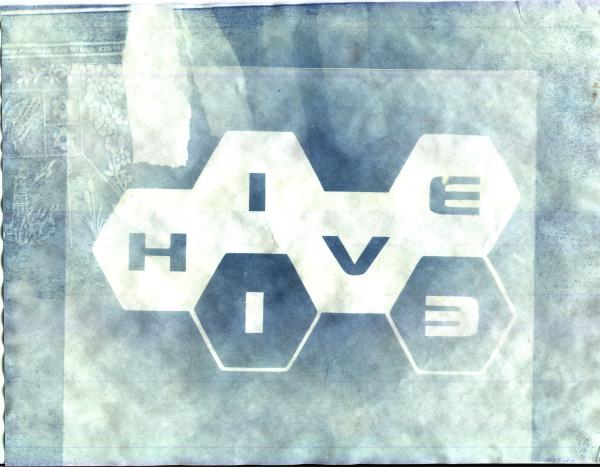
Here’s the exposed, but not developed, print:
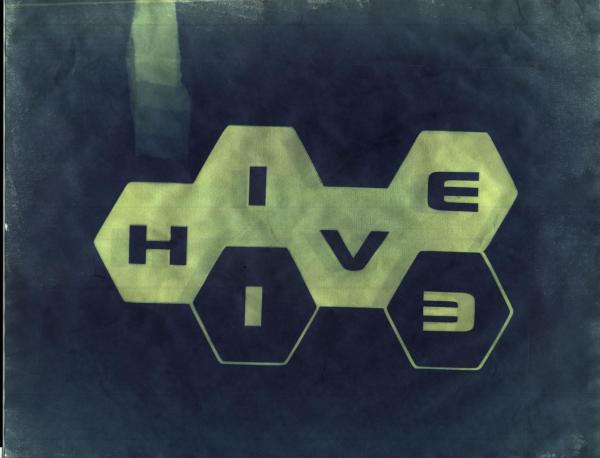
The gradient in the top left is a strip of paper that I moved away at periodic intervals. I placed several strips of paper to the right but they were removed first and aren’t visible here. The Hive13 logo also has a faint image to the left, probably from me moving the print early in the exposure and jolting the negative a little.
I developed the print (just rinsed it in cold water until the water ran clear) and let it dry for maybe 7 hours:
There are a lot of artifacts here. The darker border might be from the edges of the acetate on the negative. The things in the top left are some etching on one of the plates of glass that I used to hold the negative. In the undeveloped print, the strip to the right of that has clearly visible steps of tone, and I find it a little weird that all of these developed to pure white, while areas that are all the same color in the undeveloped print turned into clearly different tones in the developed one. I probably should read up on how to control this better.
But all in all, I’m impressed with how it turned out after 3 tries.